
I'm going to start today with a post about a lipstick holder that *did* actually get alot of comments when I posted the photo on twitter so I'm going to show you what I used and how it turned out!
(disclaimer : this probably isn't very efficient storage if you have a giant lipstick collection, but it would work if have a few the you use often and want to display them instead of having to hunt them down!)
Materials needed :
- An empty birchbox (or any small cardboard box than has a lid)
- A sheet of colorful/printed scrapbook paper to lay in the bottom
- Hot glue and craft glue. I tried both and feel like hot glue worked best to keep the separators in
- Makeup clip art printed out from online or found in magazines
- An ink pen or marker for making spacing guides
- A paint brush
I subscribed to Birchbox (click the link if you've never heard of them before!) for several months, and for some reason I always kept the little cardboard boxes.

(this photo came from I found on Once Bitten's blog thanks to Google. I don't actually have anymore intact boxes.)
I ended my subscription and just had all of these boxes laying around. Trying to think of something to do with them, I got the idea to use them for makeup storage. I tried about 10 different ideas before I realized it would be the perfect lip stick holder.
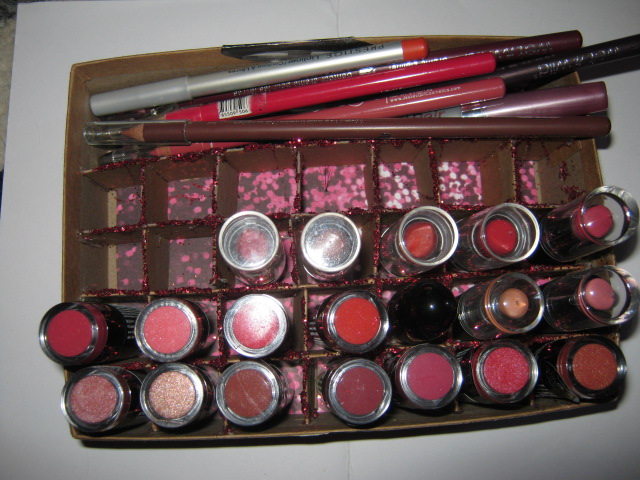
Using the bottom half of the box as the actual holder and the lid cut into strips to use as separators. These do not have to be cut very neatly, as they will be down inside the base, almost invisible after lipsticks are in their spaces. You will need 3-4 box length strips (Depending on how many spaces you need) and 5-8 short strips (depending on the size of your lipsticks).

To figure out how many small strips you will need, take your largest lipstick and your marker or ink pen and use the lipstick to make guides on the inside of the holder. Once you have the first row in, you won't need to make anymore guides. Also make guides so you know how deep to make the spaces!

Don't mind my chewed up box. It's what I had left over after this project!
You will use the hot glue and put the box length strips in first. Make sure to hold the sides of your holder tightly as the glue hardens so it doesn't pull away from the end of your strip. Once that's in place, you'll use the hot glue and put in all your smaller separators.
Once you've glued in all of your separators, it should look something like this :
See. It doesn't have to be perfect.
I kept an empty space in the back. I don't have a ton of lipsticks so I keep lip liners/pencils in the space. As I accumulate more lipsticks, I'll be able to go back in and add more separators if I want to!
After the glue has hardened and you have the desired amount of spaces, you will want to use the clip art you have. I, personally, just flipped through an InStyle magazine to get enough to cover the box. The "makeup" across the front was the header to the beauty section in last year's holiday issue I believe. I have cut outs of nailpolish, lipstick, eyeshadows, etc.. all around the box. Using a paint brush, apply a thin layer of craft glue to each clipping and begin to layer them on!
When the clippings are all dried to the box, you can put in your products!

Voila! A simple lipstick holder made from things most women just have hanging out around the house.
Price to make : FREE.


I love this. I keep thinking about making something like this, but I just do not have enough lipsticks to warrant it yet. I like the idea of leaving some open for lip liners. I will probably make one just like that when I have enough.
ReplyDeleteSmart!
ReplyDeleteThis is amazing! I have loads of boxes lying around from the beauty boxes I get and I do use them to store stuff but this is a much better method. x
ReplyDeleteSuch a great idea - i found your box via the blog hop...new follower.
ReplyDeletebecky @ http://beckysmakeup.blogspot.com
This is GENIUS!!! I am so doing it! :)
ReplyDeleteThanks so much for this idea!
xoxo, nykki
Ooooh! I like the idea of having lipsticks on display like this! It would make me feel like I was in a shop! Maybe it would take away the urge to buy so much! Lovely blog, I found you through Nykki and Kelly's bloghop! x
ReplyDeleteso clever! thanks for the great idea. just found you through the blog hop and am your newest follower. (YTBlushing Basics)
ReplyDeletehope you can drop by my blog and check it out. thanks! xo
http://www.blushingbasics.blogspot.com